தகவல் தொழில்நுட்ப முதல் தமிழ் வலைத்தளம் உங்களை அன்புடன் வரவேற்கின்றது.

Tuesday, August 20, 2013

பிளாக்கருக்குத் தேவையான புதிய Grid style image விட்ஜெட்..!

Grid Style recent post widgetகடந்த பிளாக்கர் டிப்ஸ் தொடர்பான பதிவில் புதிய பிளாக்கர்களுக்கா அடிப்படை டிப்ஸ்களைபிளாக்கர் டிப்ஸ் என்ற தலைப்பில் பதிவிட்டிருந்தோம். இன்றைய பிளாக்கர் டிப்ஸ் பதிவில் பிளாக்கரில் Grid style image recent post widget வைப்பது எப்படி எனப் பார்ப்போம். பிளாக்கரில் நிறைய பயனுள்ள விட்ஜெட்கள் இருக்கின்றன. அவற்றில் Recent Post Widget -ம் ஒன்று. இதில் பல்வேறுபட்ட நிரல்வரிகளைப் பயன்படுத்தி அவரவர் வலைப்பூவுக்கிற்கு ஏற்றவாறு கேட்கெட்டை அமைக்கிறோம். பிளாக்கர் தரும் recent Post விட்டில் படத்துடன் கூடிய தலைப்புகள் அமைந்திருக்குமாறு சமீபத்திய இடுகைகளைக் காட்ட விட்ஜெட் உள்ளது. அதில் பதிவிற்கான சுக்கத்தைக் காட்டும் வசதி.. பதிவினுள் அமைந்திருக்கும் படத்தை காட்டும் வசதி.. போன்றவைகளுடன் இருக்கும். 
அவ்வாறில்லாமல் வெறும் படத்தை மட்டுமே ஒவ்வொரு இடுகைக்கும் காட்டுமாறு அமைத்தால் எப்படி இருக்கும்? இந்த எண்ணத்தைச் செயல்படுத்தி விட்ஜெட் ஒன்றை உருவாக்கித் தந்திருக்கிறார்கள் http://www.bloggerplugins.org தளத்தினர்.
வழக்கம்போல உங்கள் பிளாக்கர் தளத்தில் லாகின் செய்துகொள்ளுங்கள்.
Design==>Page Elements==>Add Gadget==> Popular Post என்பதைத் தேர்ந்தெடுக்கவும். 
அதில் படத்தில் காட்டியுள்ளபடி image thumbnail என்பதில் மட்டும் டிக் மார்க் ஏற்படுத்திக்கொள்ளுங்கள்.
Click only Thumbnaill

பிறகு Save கொடுத்து சேமித்துக்கொள்ளுங்கள். 

முன்பே popular post widget உங்கள் தளத்தில் இணைத்திருந்தால் மேற்சொன்ன மாற்றத்தை மட்டும் செய்து சேமித்துவிடுங்கள். 

இப்போது வார்ப்புருவில் படங்களை மட்டும் Grid Style-ல் காட்டுவதற்கான நிரல்வரிகளைச் சேர்க்க வேண்டும். அதற்கு Design ==> Edit HTML என்பதை திறந்துகொள்ளவும். Expand Widget Template என்பதில் டிக்மார்க்கை ஏற்படுத்த வேண்டாம். அதில் காட்டப்படும் வலைப்பூவின் வார்ப்புரு நிரலில் இந்த வரிகளைத் தேடுங்கள்.


மேற்கண்ட நிரல்வரிகளை நீக்கிவிட்டு, அதற்குப் பதிலாக கீழிருக்கும் நிரல்வரிகளை கொடுத்து Save Template அழுத்தி செய்த மாற்றத்தை சேமித்துக்கொள்ளவும்.


பிறகு Template Designer என்பதைச் சொடுக்கி தோன்றும் பக்கத்தில் இறுயில் இருக்கும் Advanced என்பதை கிளிக் செய்யவும்.

Click to Template Designer
இப்போது தோன்றும் பக்கத்தில் Add Custom CSS என்பதில் கீழ்க்கண்ட நிரல்வரிகளை காப்பி செய்து பேஸ்ட் செய்துகொள்ளவும்.


பிறகு வலது மேல் மூலையில் Apply to Blog என்பதைக் கிளிக் செய்யவும்.

அவ்வளவுதான். முடிந்தது. இப்போது உங்கள் பிளாக்கரில் Grid style image recent post widget இணைந்திருக்கும்.
Grid Style recent post widget

இதுபோன்ற விட்ஜெட்கள் படங்களை மட்டும் பதிவேற்றம் செய்யும் வலைப்பூக்களுக்கு(Image Gallery Blogs) பொருத்தமாக இருக்கும். மேலும் பலதரப்பட்ட பதிவுகளைக் கொடுக்கும் வலைப்பூக்களும் ஓரளவு பொருந்திப்போகும். இதனால் தளத்தில் வரும் வாசகர்கள்(Visitors) படங்களைப் பார்த்து கிளிக் செய்யும் வாய்ப்புகள் அதிகம். இன்னும் சொல்லப்போனால் வார்த்தைகளாக உள்ள தலைப்பைப் பார்த்து, படித்து அதை கிளிக் செய்யும் நேரத்தைவிட படமாகப்(Image) பார்த்தால் உடனே அதை கிளிக் செய்யத் தோன்றும். இந்த உத்தி உங்கள் வலைப்பூவின் தரத்தை உயர்த்தும், மேலும் வாசகர்களின் கவனத்தையும் ஈர்க்க முடியும். நன்றி நண்பர்களே..!!

Thursday, August 15, 2013

பிளாக்கரில் விளம்பரங்கள் வைக்க சூப்பர் ட்ரிக்


வணக்கம் நண்பர்களே.. பிளாக்கரில் ஒரு பயனுள்ள வசதி.. விளம்பரங்கள் வைப்பது. நம்முடைய தளத்தை நிறையபேர் படிக்கும்போது தளமானது பிரபலமடையும். அவ்வாறு பிரபலமான தளத்திற்கு google adsense, chitka, AdSense, Text Link Ads, AdBrite, LinkWorth, Amazon போன்ற நிறுவனங்கள் வலைத்தளங்களுக்கான ஆட்சென்ஸ் தருகிறது. உங்கள் தளம் அவர்கள் குறிப்பிட்ட AdSense program policies களுக்கு உட்பட்டு இருப்பின் உங்களுக்கு ஆட்சென்ஸ் அப்ரூவல் கிடைக்கும். பிறகு உங்கள் தளத்தில் காட்டுவதற்கான விளம்பர நிரல்கள் அத்தளத்தில் கிடைக்கும்.

அவ்வாறு பெற்ற ஆட்சென்ஸ் கோடிங்கானது(Ad sense coding) பெரும்பாலும் JAVA SCRIPT அடிப்படையாகக் கொண்டிருக்கும். நேரடியாக அந்த நிரல்வரிகளை டெம்ப்ளேட்டின் நிரல்வரிகளுடன் இணைக்கும் போது அவை வேலை செய்யாது. இவ்வாறு வேலை செய்யாத கோடிங்குகளை பிளாக்கரின் டெம்ப்ளேட்டிற்கு (xml Blogger template) ஏற்றவாறு இந்த விளம்பர நிரல்வரிகளை மாற்ற வேண்டும். அப்போதுதான் அந்நிறுவனத்தாரின் விளம்பரங்கள் உங்களுடைய பிளாக்கர் தளத்தில் தெரியும்.

அந்த வகையில் உங்கள் விளம்பர நிரல்வரிகளை பிளாக்கருக்கு ஏற்றவாறு கன்வர்ட் செய்ய ஒரு தளம் உள்ளது. இந்த தளத்திற்கு சென்று http://www.eblogtemplates.com/blogger-ad-code-converter/அதிலுள்ள பெட்டியில் உங்கள் விளம்பர கோடிங்குகளை கொடுத்து பிளாக்கருக்கு ஏற்ற வகையில் மாற்றிக்கொள்ளலாம். அதாவது encode செய்துகொள்ளலாம். பிறகு மாற்றப்பட்ட நிரல்வரிகளை உங்கள் பிளாக்கரின் வார்ப்புருவில் வேண்டிய இடத்தில் சேர்த்து விடுங்கள். இப்போது உங்கள் விளம்பரங்கள் தளத்தில் அருமையாக காட்சியளிக்கும்

Encoding என்ற வுடனேயே இந்த தளமும் நினைவுக்கு வருகிறது. நான் அடிக்கடி பயன்படுத்தும் தளமும் கூட.. www.centricle.com என்ற தளத்தில் tools என்ற ஆப்சனைக் கிளிக் செய்து தோன்றும் பெட்டியில் உங்கள் விளம்பர நிரல்வரிகளைக் கொடுத்து encode, decode செய்து கொள்ளமுடியும். 

இந்த தளத்தில் நேரடியாக உங்கள் விளம்பர கோடிங்கை convert செய்ய இந்த இணைப்பில் செல்லவும்.

நீங்கள் கூகுள் ஆட்சென்ஸ் போன்றவைகளைப் பயன்படுத்தினாலும் இந்த மாற்றங்கள் AdSense program policies க்கு எதிரானது அல்ல. அதாவது இதனால் ஆட்சென்ஸ் கணக்கு முடக்கப்படுமோ என்று அச்சப்படத் தேவையில்லை. Xml blogger -க்கு ஏற்றவகையில் adsense coding-ஐ அதற்குத் தகுந்தவாறு மாற்றுகிறோம்.. அவ்வளவே.. இதையே தளத்தில் page source சென்று உறுதிப்படுத்திக் கொள்ளலாம். page source -ல் விளம்பர நிறுவனம் அளித்த ஒரிஜினல் விளம்பர நிரல்வரிகள் எந்த மாற்றமும் இல்லாமல் அப்படியே காட்டும்.

இவ்வாறு encoding செய்யும் போது HTML ஸ்பெஷல் கேரக்டர்கள் <, >, & போன்றவை <, >, & இவ்வாறு மாற்றப்படுகிறது. அவ்வளவே..!!!!

இனி உங்களுக்கு கொடுக்கப்பட்ட விளம்பர நிரல்வரிகளை உங்கள் தளம், வலைப்பூவில் உள்ளிட்டு, கணிசமான வருவாய் ஈட்டுங்கள்... வாழ்த்துகள் நண்பர்களே...!!

பிளாக்கரில் அறிவிப்பு வானொலி பக்க உறுப்பு


wesmobwidget
நம் தளத்தில் வானொலி வடிவத்தில் ஒரு படத்துடன் அருகில் சில அறிவிப்புகள் ஓடினால் எப்படி இருக்கும் . கீழ் உள்ள டெமோ என்ற பொத்தானை அழுத்தி மெனு பாரின் கீழ் ஸ்க்லோரிங் பார் ஒன்று ஓடும் அதை தான் நாம் இந்த பதிவில் காண போகிறோம் .

wesmobwidget23


Live Demo

முதலில் பிளாக்கர் கணக்கில் நூலைந்து கொண்டு தளவமைப்பு ( DESIGN) சென்று ஒரு பக்க உறுப்பை சேர் (Add a gedget / Add a page element / Add a widget )என்பதை சொடுக்கி HTML &amp; JAVA SCRIPT என்பதை தேர்ந்தெடுத்து கொள்ளுங்கள் .கீழ் உள்ள நிரலை COPY PASTE செய்து விடுங்கள் .( அடியில் உள்ள மாற்றங்களை செய்தவுடன் )

<style type="text/css">

/*Example CSS for the two demo scrollers*/

#pscroller2{
background:url(https://blogger.googleusercontent.com/img/b/R29vZ2xl/AVvXsEjvru0Ao6w9rwdowXnmfNuIcWueJ0XHXN3jEl1bsfwFJrLzVyfOcJL1gElx8BD7zMKw0xa1Ld4_rGiZnFUVvihTGGsjWhwgh69YGZEY1r_BcuDrVxxoPZM6Crhwq-zx9r7oP4NOrWhkPX0/s400/updates1.gif) no-repeat top left;
width: 430px;
height: 20px;
border: 1px solid #ddd;
padding: 3px 3px 3px 40px;
margin:10px 0;
}

#pscroller2 a{
text-decoration: none;
color:#0080ff;
}

#pscroller2 a:hover{
text-decoration: underline;
}

.someclass{
}

</style>

<script type="text/javascript">

/*Example message arrays for the two demo scrollers*/


var pausecontent2=new Array()
pausecontent2[0]='<a href="#">HEADLINE TEXT</a>'
pausecontent2[1]='<a href="#">HEADLINE TEXT</a>'
pausecontent2[2]='<a href="#">HEADLINE TEXT</a>'
pausecontent2[3]='<a href="#">HEADLINE TEXT</a>'

</script>

<script type="text/javascript">
function pausescroller(content, divId, divClass, delay){
this.content=content //message array content
this.tickerid=divId //ID of ticker div to display information
this.delay=delay //Delay between msg change, in miliseconds.
this.mouseoverBol=0 //Boolean to indicate whether mouse is currently over scroller (and pause it if it is)
this.hiddendivpointer=1 //index of message array for hidden div
document.write('<div id="'+divId+'" class="'+divClass+'" style="position: relative; overflow: hidden"><div class="innerDiv" style="position: absolute; width: 100%" id="'+divId+'1">'+content[0]+'</div><div class="innerDiv" style="position: absolute; width: 100%; visibility: hidden" id="'+divId+'2">'+content[1]+'</div></div>')
var scrollerinstance=this
if (window.addEventListener) //run onload in DOM2 browsers
window.addEventListener("load", function(){scrollerinstance.initialize()}, false)
else if (window.attachEvent) //run onload in IE5.5+
window.attachEvent("onload", function(){scrollerinstance.initialize()})
else if (document.getElementById) //if legacy DOM browsers, just start scroller after 0.5 sec
setTimeout(function(){scrollerinstance.initialize()}, 500)
}

// -------------------------------------------------------------------
// initialize()- Initialize scroller method.
// -Get div objects, set initial positions, start up down animation
// -------------------------------------------------------------------

pausescroller.prototype.initialize=function(){
this.tickerdiv=document.getElementById(this.tickerid)
this.visiblediv=document.getElementById(this.tickerid+"1")
this.hiddendiv=document.getElementById(this.tickerid+"2")
this.visibledivtop=parseInt(pausescroller.getCSSpadding(this.tickerdiv))
//set width of inner DIVs to outer DIV's width minus padding (padding assumed to be top padding x 2)
this.visiblediv.style.width=this.hiddendiv.style.width=this.tickerdiv.offsetWidth-(this.visibledivtop*2)+"px"
this.getinline(this.visiblediv, this.hiddendiv)
this.hiddendiv.style.visibility="visible"
var scrollerinstance=this
document.getElementById(this.tickerid).onmouseover=function(){scrollerinstance.mouseoverBol=1}
document.getElementById(this.tickerid).onmouseout=function(){scrollerinstance.mouseoverBol=0}
if (window.attachEvent) //Clean up loose references in IE
window.attachEvent("onunload", function(){scrollerinstance.tickerdiv.onmouseover=scrollerinstance.tickerdiv.onmouseout=null})
setTimeout(function(){scrollerinstance.animateup()}, this.delay)
}


// -------------------------------------------------------------------
// animateup()- Move the two inner divs of the scroller up and in sync
// -------------------------------------------------------------------

pausescroller.prototype.animateup=function(){
var scrollerinstance=this
if (parseInt(this.hiddendiv.style.top)>(this.visibledivtop+5)){
this.visiblediv.style.top=parseInt(this.visiblediv.style.top)-5+"px"
this.hiddendiv.style.top=parseInt(this.hiddendiv.style.top)-5+"px"
setTimeout(function(){scrollerinstance.animateup()}, 50)
}
else{
this.getinline(this.hiddendiv, this.visiblediv)
this.swapdivs()
setTimeout(function(){scrollerinstance.setmessage()}, this.delay)
}
}

// -------------------------------------------------------------------
// swapdivs()- Swap between which is the visible and which is the hidden div
// -------------------------------------------------------------------

pausescroller.prototype.swapdivs=function(){
var tempcontainer=this.visiblediv
this.visiblediv=this.hiddendiv
this.hiddendiv=tempcontainer
}

pausescroller.prototype.getinline=function(div1, div2){
div1.style.top=this.visibledivtop+"px"
div2.style.top=Math.max(div1.parentNode.offsetHeight, div1.offsetHeight)+"px"
}

// -------------------------------------------------------------------
// setmessage()- Populate the hidden div with the next message before it's visible
// -------------------------------------------------------------------

pausescroller.prototype.setmessage=function(){
var scrollerinstance=this
if (this.mouseoverBol==1) //if mouse is currently over scoller, do nothing (pause it)
setTimeout(function(){scrollerinstance.setmessage()}, 100)
else{
var i=this.hiddendivpointer
var ceiling=this.content.length
this.hiddendivpointer=(i+1>ceiling-1)? 0 : i+1
this.hiddendiv.innerHTML=this.content[this.hiddendivpointer]
this.animateup()
}
}

pausescroller.getCSSpadding=function(tickerobj){ //get CSS padding value, if any
if (tickerobj.currentStyle)
return tickerobj.currentStyle["paddingTop"]
else if (window.getComputedStyle) //if DOM2
return window.getComputedStyle(tickerobj, "").getPropertyValue("padding-top")
else
return 0
}

</script>


<script type="text/javascript">

//new pausescroller(name_of_message_array, CSS_ID, CSS_classname, pause_in_miliseconds)
new pausescroller(pausecontent2, "pscroller2", "someclass", 1000)

</script>

உங்களுக்கு தேவையான ஒலிபெருக்கி URL ஐ போட்டு கொள்ளுங்கள் . அகலம 430 என்று கொடுத்துள்ளது அதை உங்களுக்கு தேவையான அளவு வைத்து கொள்ளுங்கள் . 0080FF லிங்க் வண்ணமாகும் . உங்களுக்கு தேவையான வண்ணத்தின் கோடிங்கை கொடுத்து விடுங்கள் . HEADLINE TEXT என்னும் மிடத்தில் டெக்ஸ்டை எழுதி விட்டு அதற்க்கான URL ஐ அதன் முன்னே உள்ள சிலேஸ் (#) குறியீட்டை அழித்து விட்டு கொடுத்து விடுங்கள். கீழ் உள்ள 1000 என்பது டைம் ஆகும் அதை கூட்டினால் ஸ்க்ரோலிங்க் பாரின் வேகம் கூடும் . நன்றி .....

Monday, August 12, 2013

ப்ளாக்கர் : பதிவை சுற்றி பார்டர் அமைப்பது எப்படி ? ( Post around borders )


ப்ளாக் எழுதும் நண்பர்கள் அனைவரும் தங்களுக்கு 
பிடித்த வார்ப்புருவை(template) தேர்ந்தெடுத்து பயன்படுத்துவார்கள் ... சிலர் ப்ளாக் கொடுக்கும் சாதாரண வார்ப்புருவை (simple template) பயன் படுத்துவார்கள் ... அப்படி நாம் பயன்படுத்தும் டெம்ப்ளேட் பார்க்க அவ்வளவு ஒன்றும் அழகாக இருக்காது ...
ஓரளவு இருக்கும் ..


அது போன்ற டெம்ப்ளேட் பயன்படுத்துபவர்கள் தங்கள் வார்ப்புருவை எப்படி மாற்றி அமைக்கலாம் என்று பார்போம் ..


இன்று நாம் பார்க்க இருப்பது நம் பதிவை சுற்றி பார்டர் அமைப்பது எப்படி என்று ..அதாவது நம் பதிவை அழகாக காட்ட இது போன்றவற்றை செய்தால் நன்றாய் இருக்கும்(கரண்ட் கட் )

இதற்கு நம் செய்ய வேண்டியது கீழ காணும் இந்த கோடிங்கை தேடி

அதற்கு கீழே ஒரு சிறு கோடிங்கை சேர்த்தால் போதும் ...


.post { அல்லது .post


border:2px dashed #E06E1E;

#E06E1E -வண்ணத்தின் code


2px பார்டரின் அகலம் 3px,4px,5px,6px,....9px,11px இப்படி கூடிக் கொண்டே போனால் பார்டர் கட்டையாகி கொண்டே செல்லும் ...

மேலும் பார்க்க :

HTML பகுதி ஏழு - அழகான பார்டர்கள் உருவாக்க

HTML பகுதி எட்டு - சி.எஸ்.எஸ். பார்டர்கள் ப்ளாக்-க்கு எளிதில் ஒரே நொடியில் உருவாக்கலாம்


சேர்த்த பின் இப்படி இருக்க வேண்டும் :


.post {
border:2px dashed #E06E1E;
........
....(some codes) ..
...........
}


பிளாக்கரில் இணைக்கும் படங்களுக்கு எளிதில் பார்டர் கொடுக்க :

மேலும் பிளாக்கரில் இடுகை எழுதும் போது படங்களை இணைக்க அந்த ஐக்கானை அழுத்தி இணைப்போம் .....

இணைத்து முடித்தவுடன் ஒரு சின்ன வேலை HTML என்னும் பட்டனை அழுத்தி


இதில் பார்டர் வந்திருக்கும் ...


____________________________________________________________


மேலும் கீழே உள்ள இடது பக்கத்தில் படத்தை வைத்து வலது பக்கத்தில்

பதிவுகள் வர


அனைத்து பதிவுகளுக்கும் பயன்படுத்த :

.post{
background:url(http://static1.grsites.com/user/folders/azwolver/r4933529/border49674897.jpg);
border: 5px solid rgb(51, 0, 204);
color: #003366;
font-size: 13px;
line-height: 83px;
margin: 0pt;
padding: 17px 15px 15px 115px;
text-align: justify;}
பதிவுகளின் இடையில் பயன் படுத்த :

YOUR TEXT HERE


”காதலிக்கலாமா என்று சிந்திப்பவர்கள், சன்யாசம் வாங்கிக் கொள்ளலாமா என்று யோசிப்பவர்கள், தற்கொலை செய்து கொள்ளலாமா என்று ஆராய்பவர்கள் எல்லாரும் ஒரே ரகம். நினைப்போடு சரி” .

”இறைவன் மனிதர்களுக்குச் சிறிதும் அநீதி இழைப்பதில்லை.
ஆனால் மனிதர்கள்தான் தங்களுக்குத் தாங்களே அநீதி இழைத்துக் கொள்கிறார்கள்.”
-நபிகள் நாயகம்


அனைத்து பதிவுகளுக்கும் பயன்படுத்த :

.post{
background-image: url(http://static1.grsites.com/user/folders/azwolver/r4213012/border41324848.jpg);
border: 3px solid rgb(85, 107, 47);
color: black;
font-family: verdana;
font-size: 13px;
line-height: 40px;
margin: 0pt;
padding: 15px 15px 15px 115px;
text-align: justify;
}
பதிவுகளின் இடையில் பயன் படுத்த :

YOUR TEXT HERE


எண்ணத்தில் கவனமாய் இருங்கள்;
ஏனெனில் எண்ணங்கள்தான் சொற்களாகின்றன.
சொல்லில் கவனமாய் இருங்கள்;
ஏனெனில் சொற்கள்தான் செயல்களாகின்றன.
செயலில் கவனமாய் இருங்கள்;
ஏனெனில் செயல்கள்தான் பழக்கங்களாகின்றன.
பழக்கத்தில் கவனமாய் இருங்கள்;
ஏனெனில் பழக்கங்கள்தான் ஒழுக்கங்களாகின்றன.
ஒழுக்கத்தில் கவனமாய் இருங்கள்;
ஏனெனில் ஒழுக்கம்தான் உங்கள் வாழ்வை வடிவமைக்கின்றது!”
-அருட்தந்தை வேதாத்திரி மகரிஷி

__________________________________________________________________


அனைத்து பதிவுகளுக்கும் பயன்படுத்த :

.post{


background-image: url(http://static1.grsites.com/user/folders/azwolver/r4213012/border41324848.jpg);
border: 3px solid rgb(85, 107, 47);
color: black;
font-family: verdana;
font-size: 15px;
line-height: 20px;
margin: 0pt;
padding: 15px 15px 15px 115px;
text-align: justify;
}


YOUR TEXT HERE


மரம் சும்மா இருந்தாலும் காற்று அதை சும்மா


இருக்கவிடுவதில்லை


-சீனப்பெரும் தலைவர் மாவோ


சந்தத்தை நம்பி கவிதை இருக்கலாம்,
தந்தத்தை நம்பி யானைஇருக்கலாம்,
சொந்தத்தை நம்பி நீ இருக்காதே,
பந்தத்தை நம்பி மதிப்பை இழக்காதே.


___________________________________________________________________

அனைத்து பதிவுகளுக்கும் பயன்படுத்த :

.post{
background-image: url(http://static1.grsites.com/user/folders/azwolver/r4213292/border46975783.jpg);
border: 10px solid rgb(85, 107, 47);
color: black;
font-family: verdana;
font-size: 15px;
line-height: 20px;
margin: 0pt;
padding: 15px 15px 15px 115px;
text-align: justify;
}
குறிப்பிட்ட பதிவுக்கும் மட்டும் :

YOUR TEXT HERE


நண்பனே!

நாளைய மழை அறியும் எறும்பாய் இரு

நேற்றைய மழைக்கு இன்று குடை பிடிக்கும்

காளானாய் இராதே!


____________________________________________________________________


Give your topic a boost with a coordinated HTML background, border, or button.
Keep scrolling for more examples.


நம் புத்திக்கு எட்டாத வழிகள் நான்குண்டு.

1.வானத்திலே கழுகினுடைய வழி,

2.பாறைகளின் மேலே பாம்பினுடைய வழி,

3.நடுக்கடலிலே கப்பலினுடைய வழி,

4.ஒரு பெண்ணை காதலித்த மனுஷனுடைய வழி.

______________________________________________________________


YOUR TEXT HERE


பொன்மொழிகள்
”புத்தகங்களை யாருக்கும் இரவல் தராதீர்கள்.

அது உங்களுக்குதிரும்ப வராது.

என்னிடம் உள்ள புத்தகங்கள் யாவும்

என் நண்பர்கள் எனக்கு இரவல் தந்தது தான்”

-பிரெஞ்சு நாவலாசிரியர் அனடோல் பிரான்ஸ்.

இவர் சுயசரிதை புத்தகத்தின் பெயர்


“என் நண்பனின் புத்தகம்”.

கவனிக்க : பார்டரின் அகலத்தை 1px , 2px , 3px , 4px வரை வையுங்கள் ..
அதிகமாக வைத்தால் பார்டர் மிகவும் கட்டையாக தெரியும் ..
மேலும் பெரிய பதிவுகளுக்கு line-height என்பதை அதற்கு ஏற்ற படி வைத்து கொள்ளுங்கள் ..

நன்றி நண்பர்களே சந்தேகம் இருந்தால் கண்டிப்பாக பின்னூடத்தில் கேட்கவும்

Sunday, August 11, 2013

How To Create Labels In Blogger

Quickly, I will walk you through how to create labels in blogger. A label helps you to systematically arrange your posts in blogger.
label1
5 Easy Steps To Create A Label
1. In your blogger settings, Locate and Click “Page Options” on the left hand side of your screen.
labe2
2. Locate  “New Page” and Select “Web Address”
label3
3. Put your desired label name (Eg. “Editorial”) in the title and use the web address set the label path. For linking internally (withing your blog) use this standard procedure below
 http://YOUR-BLOG-NAME.blogspot.com/search/label/YOURCHOSENWORD
4. To link your label externally (to another website), insert the full url of the website inside the web address field.
5. Add the Label to your post before you Publish.
label4

Thursday, August 8, 2013

வலைப்பூக்களுக்கு(வலைப்பதிவு) தேவையான சில ஜாவா ஸ்கிரிப்ட்கள்

Some_Java_Script_For_Blogs
நண்பர்களே இன்று நாம் பார்க்க போவது சில ஜாவா ஸ்க்ரிப்ட்-கள் ...

இந்த ஜாவா ஸ்க்ரிப்ட்-கள் சாதாரணமாக இணையதளங்களுக்கும் பயன்படும்..
இணைய ப் பக்கங்களில் ஜாவா ஸ்கிரிப்ட் இல்லை என்றால் சில செயலிகள் இயங்காது ... இணையத்தின் முக்கியமான நிரலியாக ஜாவா ஸ்க்ரிப்ட் உள்ளது என்றால் அது மிகை ஆகாது ..


முதலில் நாம் பார்க்க போவது நம் தளத்திற்கு வரும் வாசகர்களை புக் மார்க் செய்யும் ஒரு செயலி இந்த ஜாவா ஸ்கிரிப்டை இணைப்பதனால் நம் தள வாசகர்கள் எளிதில் ஒரே கிளிக்கில் நம் தளத்தை புக் மார்க் செய்ய முடியும் ..

இந்த ஜாவா ஸ்கிரிப்ட் பல நாட்களாக முயற்சித்தேன் இன்று தான்

தெளிவாக புரிந்தது ..


http://mjmrimsi1.blogspot.com//
','எம்.ஜே.எம். றிம்சி பக்கம் வழங்கும் படித்தில் பிடித்தது கற்ப்பிக்க சிறந்தமுறை')">


இங்கே'http://mjmrimsi1.blogspot.com/என்னும் இடத்தில் உங்கள் தளத்தின் URL -ம்

என்டர் தி வேர்ல்ட்என்னும் இடத்தில் ... உங்கள் தளத்தின் தலைப்பையும் எழுதிக்

கொண்டு ஏற்கனவே உள்ள HTML & JAVA SCRIPT விட்ஜெட் -ஐ ஓபன் செய்து

அங்கு கடைசியில் PASTE செய்யவும் ....

அல்லது ... DESIGN- ADD A GEDJET -HTML & JAVA SCRIPT ---PASTE THE CODE


TEST ----DEMO--- 


இனி எளிதாக உங்கள் தளத்தை புக் மார்க் செய்யலாம் ...


இது FIRE FOX 3.0 -க்கு மேல் INTERNET EXPLORAR 8.0 மேல் உள்ள உலாவிகளில் மட்டும் வேலை செய்யும்
உங்கள் தளத்தை மூடும் போது ... அதாவது உலாவியில் உங்கள் தளம் திறந்திருக்கும் அதை நீங்கள் மூடும் போது ஒரு சிறிய செய்தி கொடுப்பதற்கு


" இந்த தளத்திற்கு வந்தமைக்கு நன்றி மீண்டும் வருக "

இப்படி செய்தியை கொடுப்பதற்கு ..1.

        என்பதற்கு கீழே  அல்லது அதற்கு பின்னால்பின்வரும் கோடிங்கையும்


2.


அல்லது

இதற்கு  பதிலாக கீழே உள்ள கோடிங்கை சேர்த்து டெம்ப்ளேட்-ஐ SAVE செய்து 

பின்னர் போய் பார்க்கவும் ...

<body onUnLoad='testAlert1()'>


இதனை  சோதிப்பதற்கு இங்கே செல்லவும்

 இந்த தளத்திற்கு சென்று ஒரு சில பக்கங்களை திறந்து அதனை மூடும் போது .. அச்செய்தி வரும்

இன்னும்  பிற பயனுள்ள ஜாவா ஸ்கிரிப்ட்-களை வரும் அடுத்த பகுதிகளில் பார்போம் ...

பயனுள்ள  பதிவு என்றால் பேஸ் புக் ,ட்விட்டர் ,கூகுள் பிளசில் பகிர்ந்து கொள்ளவும்...

நன்றி

Friday, August 2, 2013

Creating a Blogger Static Home Page


Seems like there's always an unusual case where you want to create a Blogger blog with a static home page instead of the reverse order blog posts instead. I see this question quite often in the forums and support pages of other sites. Though this isn't a typical configuration for Blogger, the recent changes in the new layout editor have made this easier than ever without having to spend time editing the template code as you had in the past.

Add the Static Home Page

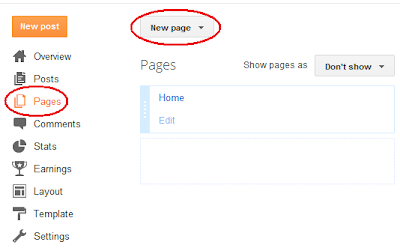
The first step is to simply create a static page in Blogger called something like 'Home Page' from the Blogger Pages menu item. Don't call it 'Home' yet because we're going to alter the home link later. When you click on the 'Pages' left menu item in the Blogger editor main menu you'll see that there is already a 'Home' link on the screen. Ignore that for now--just go up to the 'New Page' drop down box and select the 'Blank page' option:

Blogger static pages


You'll now be in the Page editor which looks a lot like the Blogger Post editor. At the top enter a page name such as 'Home Page' or 'Main Page' for now and some default text - we'll alter it later. Just go ahead and press 'Publish':

Publish a Google Blogger page


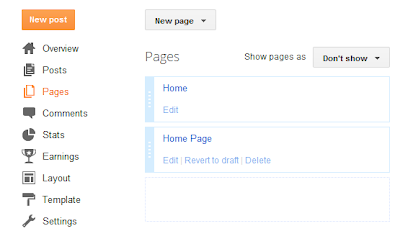
You should now see two pages in your list; 'Home' and 'Home Page' like so:

Blogger Pages


Now that you've created a static page, the next steps are are a bit tricky since you need to make sure your static page becomes 'Home' and the old Home link is hidden especially if you want to use menus.

Redirecting the Blogger Home Page to a Static Page

The great thing about the new Blogger template is that you can redirect pages to other pages now in the 'Settings' menu. Oddly, it is buried deep within the Blogger settings under 'Search Preferences':

Custom redirects in Blogger settings


Go ahead and choose the 'Edit' text link just to the right of the 'Custom Redirect' item. Now, this is a very critical step - be sure to enter the following text into the From: and To: boxes in the Redirect dialog:


In the From: box enter only a forward slash - "/". In the To: box enter the exact page name - in our case it was "/p/home-page.html". All Blogger static pages have a /p in front of the URL. You can see that the html name was the page title we used, so if you used something else for your title like 'Main Page' then the html would be /p/main-page.html.

Go ahead and press the little 'Save' text link and then the 'Save changes' button highlighted in the image above. What's now going to happen is that your main URL will redirect to the static page you've created. Go ahead and try to access your blog now - you should go directly to the new static page from the main URL.

All is good, right?? Well, not quite. If you want to enable visible tabs for Pages on your template the problem is going to be that you'll have two menu items called 'Home' and 'Home Page' on the tab bar both redirecting to your static page.  However, if you don't care to add Pages as tabs (they're not enabled by default) - you can stop at this point. Your static home page is ready to go!

Enabling Tabs for a Static Blogger Homepage

The very last step is to hide the original Home page link and add a page link to your blog pages so that the visible tabs work correctly. First, enable tabs from the Pages menu:

Blogger Page tabs

Be sure to press 'Save arrangement' in the upper right of the screen (not seen here)!  When you go to your home page you should now see the tab bar across the top of your blog. However, now when you click on either Home or Home Page you're going directly to your new static page. What you have to do at this point is hide the original 'Home' Page using the Layout editor. Open the Layout using the editor from the Blogger main menu:


Choose the 'Edit' text link in the Pages item within the layout. This is going to allow you to hide particular pages. Once you open the Pages layout editor you'll notice that you can hide certain pages:

Be sure to un-select the check box right next to the 'Home' page to make sure it stays hidden. Press 'Save' to hide that particular tab.

The final step is to add another Page that links to the blog posts directly. This isn't something you have to do - your blog posts can still show on the right sidebar in the layout. However, if you do want to get back to the main blogging page that has the last posts together, you'll need to add a link back to them. Once we changed the Home page link to the static page there's no longer any links to the main Posts page.

NOTE (March 2014): Blogger has moved this function from the Pages section below to the Pages Gadget above. You don't add external links here but add them in the Gadget - will be updated soon. Go back into the main Blogger Page menu to add your link back as a menu tab. The first thing you'll notice is that the old Home page is now Hidden:


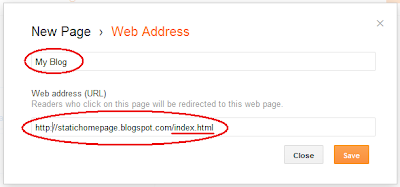
The key final step here is that you will be creating a 'Web Address' page instead of an actual Page. Create a new web address page called something like 'My Blog' to be your link to the Posts like this:


Adding a Blogger web link page

The link you need to enter is simply your full main, blog page URL (in my example page it is http://statichomepage.blogspot.com) with the addition of '/index.html' added to the end of it like this:

Linking back to the Blogger blog main page

You're done!! If you look at your blog now, you'll see the top tab bar now has a Home link and a My Blog linked correctly to the right pages. I've created a sample site to show you the final outcome. Just click on the picture here to see it. Enjoy!!!

UPDATE (3 weeks later): Please take a look at my more recent post onHow Google indexes a Blogger Static Home Page


Blogger Tips and TricksLatest Tips For BloggersBlogger Tricks

சொயற்படுத்துங்கள்

Blog Archive

Total Pageviews